If you have access to Adobe Photoshop or Adobe Elements (any version that includes Picture Package; Elements is included free with many cameras and scanners, so there's a good chance you've got a copy lying around), there's an easy way to make sheets of stickers. The Picture Package feature takes any image and prints many copies of it on a single sheet of paper.
Step 1: The standard layouts are too big for stickers, so download and unzip this folder of custom sticker layouts. Find and open your Photoshop or Elements folder (usually in the Program Files Folder on the C: drive, perhaps in a subfolder marked "Adobe"), then open the Presets folder inside it, then the Layouts folder inside Presets. Copy all the files from the folder you downloaded from me (Peter_Layouts) into the Layouts folder.
Step 2: Find or create an image that fits the proportions of one of the sticker sizes shown in the table below. It can be a lot larger than the sticker size--only the proportions are important.
|
Sticker Size
(mm) |
Proportions
|
Stickers
per A4 |
Page Size 1
|
Layout 1
|
Page Size 2
|
Layout 2 | |
| A |
17.5 x 25.5
|
7 x 10
|
100
|
8.3 x 5.5 in. (21 x 14 cm)
|
A: (50) 17.5 x 25.5...
|
8.3 x 11.7 in
|
A: ... |
| B |
19.5 x 23.75
|
4 x 5
|
99
|
2.6 x 11.7 in. (6.6 x 29.7 cm)
|
B: (33) 19.5 x 37.5...
|
8.3 x 11.7 in
|
B: ... |
| C |
17.5 x 21.5
|
6 x 7
|
120
|
8.3 x 3.8 in (21 x 9.6 cm) | C: (40) 17.5 x 21.5... | 8.3 x 11.7 in | C: ... |
| D |
12.5 x 48
|
1 x 4
|
80
|
8.3 x 5.9 in. (21 x 15 cm)
|
D: (40) 48 x 12.5..
|
8.3 x 11.7 in
|
D: ... |
| E |
17.5 x 70
|
1 x 4
|
40
|
8.3 x 11.7 in (21 x 29.7 cm)
|
E: (40) 17.5 x 70
|
n/a | n/a |
| F |
24 x 64
|
3 x 8
|
33
|
8.3 x 11.7 in. (21 x 29.7 cm)
|
F: (33) 24 x 64...
|
n/a
|
n/a |
| G |
25.5 x 37.5
|
2 x 3
|
50
|
8.3 x 11.7 in. (21 x 29.7 cm)
|
G: (50) 25.5 x 37.5...
|
n/a
|
n/a |
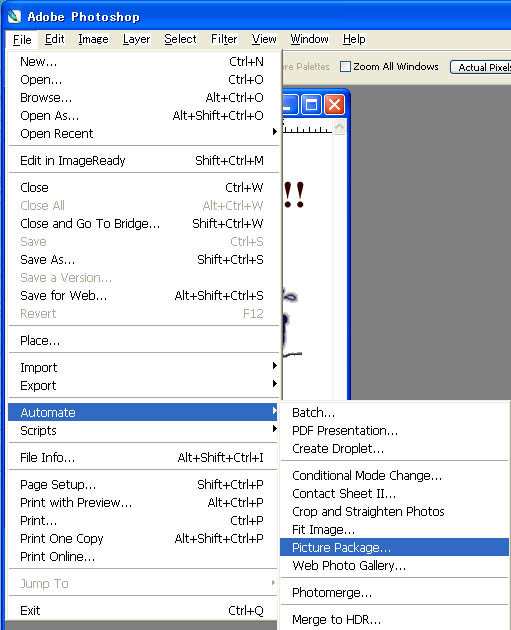
The program will automatically resize the image, rotate it 90 degrees if necessary, and insert a 2.5 mm space between stickers so you can cut the sheet up easily--you don't have to do anything about any of that. From the File menu at the top right, choose Automate, then Picture Package. Choose Page Size and Layout from the Page Size 1 and Layout 1 columns for the sticker size you want from the table above. Don't worry if the layout shown in the side of the window looks out of proportion or has a lot of empty space--the result will look better.Click OK and watch the fun. If you want E, F, or G, go to Step 3A; if you want A, B, C, or D, go to Step 3B.
Step 3A: Save the file, print it on a sheet of a A4 size uncut label paper or label film (sometimes called "no cut" or "free cut"--it just means it isn't pre-cut), cut it up, and give out your beautiful stickers. You're done.
Step 3B: This is step is necessary because Photoshop can't put more than fifty images on a page in one step. With the image resulting from Step 3 still on top in the Photoshop Window, again, from the File menu at the top right, choose Automate, then Picture Package. Choose Page Size and Layout from the Page Size 2 and Layout 2 columns above for the sticker size you want from the table above. Save the file, print it on a sheet of a A4 size uncut label paper or label film (sometimes called "no cut" or "free cut"--it just means it isn't pre-cut), cut it up, and give them out. You're done.
Troubleshooting: If it doesn't seem to look right , check that all the options are properly set in the Picture Package menu in Steps 2 and 3. The following are the defaults and you shouldn't have to change them, but if they have been changed, set them to: Resolution: 300 dpi; Mode: RGB color or Grayscale, depending on your image; Flatten All Layers: selected (checkmark in box). If you want to save the finished page of stickers as a JPEG file so that you can then open and print it with ANY imaging program, choose Flatten Image from the Layer menu at the top of Photoshop, then choose Save As from the file menu, and set .jpg, jpeg as the file type. If you're not familiar with choosing JPEG quality, then just use 8 or 9 in the Set JPEG Quality window that will then pop up.
For information on copyright and your license to use images on these pages, please click here.